(Tip: Use Ctrl-F or ⌘F key (in Mac) to search for your search term)
Systeme io FAQ is an ever-growing database of frequently asked questions. The objective of the Systeme io FAQ is to provide a quick answer to Systeme io users.
I Am New To Systeme io. Where Should I Start?
If you are new to Systeme io, here’s how you get started with Systeme io:
1. The best place to start is to watch the tutorial videos, which highlight all the important features you need to know.
>> Systeme io Tutorial
2. For specific topic help, you can browse and search the knowledge base, which is quite comprehensive.
>> Knowledge Base
3. Become Systeme io certified and accelerate your success
>> Systeme.io Certified
And last but not least, you can contact the support team if you are still facing a problem. The support is very helpful and responsive.
>> Contact Systeme io Support
Why My Plan Page Didn’t Reflect My Quota Correctly?
My Plan page is a dedicated page in Systeme io to show users their current quota usage for the Systeme io plan that users subscribed to.
The numbers in My Plan are based on the features you have activated or published.
For example, you are in the Startup Plan, and so far, you have created 2 automation workflows. However, Systeme’s My plan shows only 1 workflow.
That means you may create more than one workflow, but currently, only 1 (ONE) workflow is activated. The other workflows (although they appear under your workflows page) have yet to be activated.
When Do I Use Send Email Action In The Automation?
Send email action in the automation (both rules and workflows) is to facilitate the admin to deliver a one-off email without needing to use an email campaign or newsletter. The email content can be set right on the automation page (with the provided email editor) without requiring you to navigate away to another screen or page.
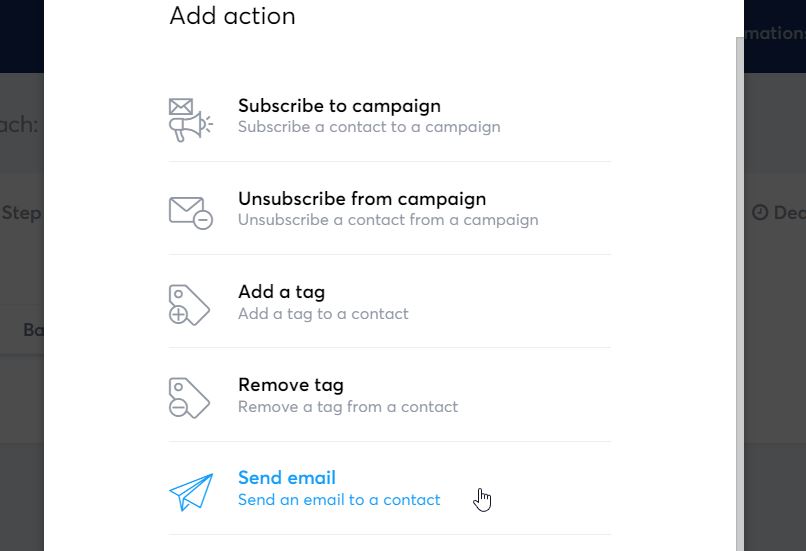
Send email action in Automation Rule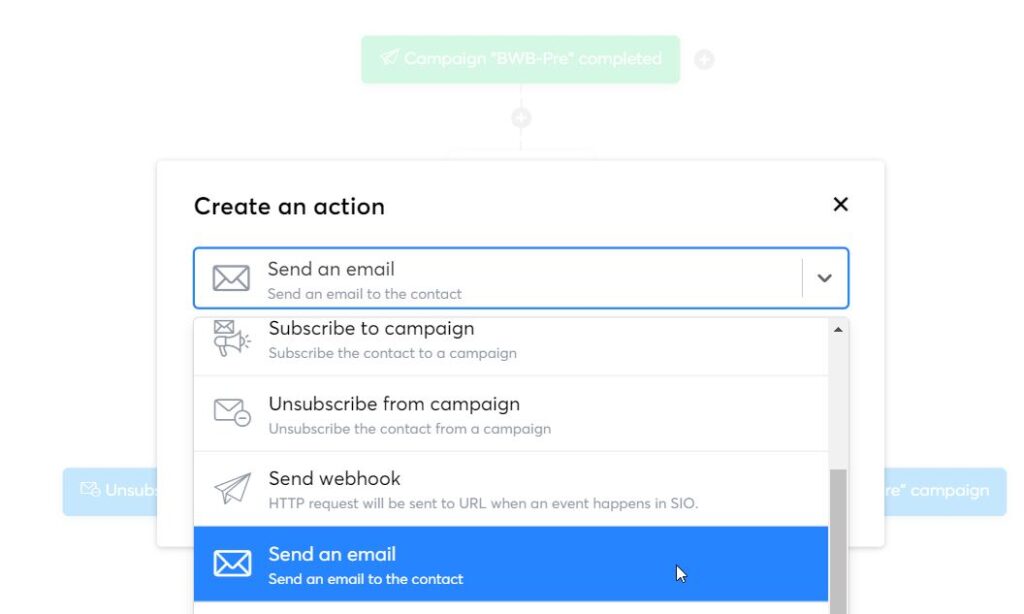 Send email action in Automation Workflow
Examples of ideal usage of Send Email Action include the delivery of digital products, either attached directly to the email or providing a download link.
To compose a new email, click on the pencil icon to open up an email editor (which looks exactly like the email campaign editor). Alternatively, drop down the selection to choose from the emails written previously.
It is worth noting that there are 2 send email actions i.e “send email” and “send email to specific address”
What Is The Size Limit For Video Upload To Systeme io?
Always try to keep the video file smaller than 1GB (max 2GB). However, it is advisable to keep the video file size as small as possible to minimize the loading time. (it is also a good practice to compress the video file before uploading it to Systeme io)
Equally important to note is that bigger file size will indirectly slow down page loading, affecting the page’s core web vital. As a rule of thumb, keeping video 200MB max will optimize the loading and page’s core web vital.
What is The Cookie Duration for the Systeme io Affiliate Program?
The cookie duration is 1 year. It was six months and was extended to 1 year in September 2022.
If someone clicks on your affiliate links and makes a purchase or upgrades their account within 1 year, you will get credited for the sales.
How To Enable Double Opt-in?
If you enabled the email settings to double opt-in, your subscribers would need to confirm the subscription every time they opt-in to your list. Otherwise, their email would not be added to the list. Double opt-in ensures that only those interested in receiving your email opted-in to your list. It also ensures your list is clean (i.e. from the bad/invalid emails)
To enable double opt-in in Systeme io, go to Settings – Emails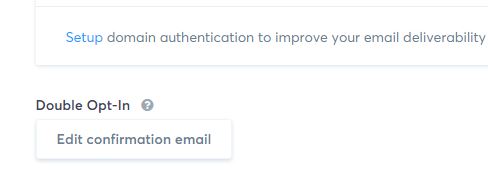
What Does Systeme io Free Migration Cover?
If you are using another platform and wish to migrate to Systeme io, you can get the Systeme io expert team to handle it.
You will get free migration if you sign up for either of the following plans:
(a) Monthly billing period for Unlimited Plan
(b) Annual billing period for ANY paid plan
What is included in the Systeme io migration?
The free migration service includes the following:
– Importation of contact lists
– Reproduction of the pages of all desired sales funnels
– Reproduction of training courses (* number of training courses allowed according to each subscription plan)
– Transfer of emails and campaigns to Systeme.io
– Reproduction of automation
The Difference Between “Send Email” and “Send Email To Specific Address” Action
In the Systeme io automation, both rules and workflows, there are 2 send email options.
(i) Send email
(ii) Send email to specific address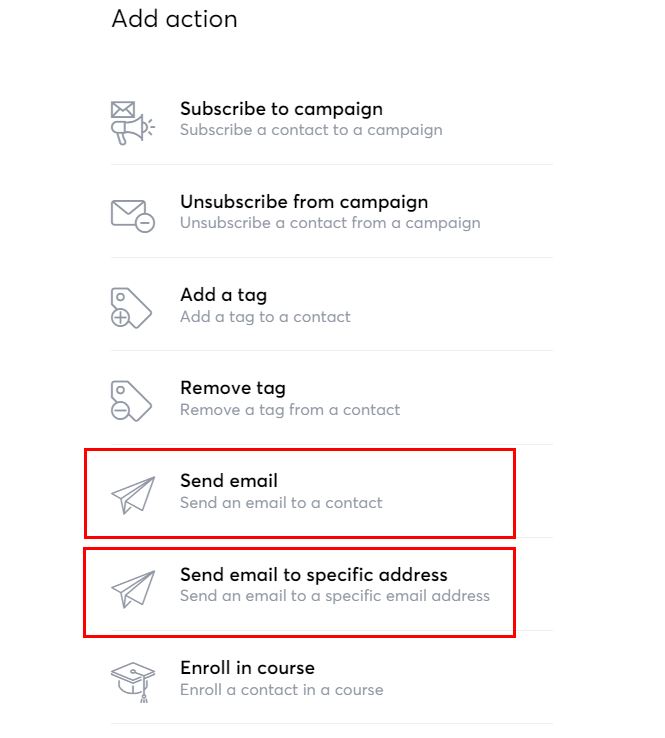
Send email
The “send email” action automates the email sent to the contact who activates a specific trigger in the automation.
For example, a buyer goes to the sales page and decides to purchase the product. After the buyer completes the purchase on the order form (i.e, trigger), the automation engine will automatically send an email (i.e action) to the buyer who makes the purchase.
Send email to specific address
As the name mentioned, this action sends an email to a specific email address. Contrary to the “send email” action, this action allows the admin to specify which email address to send the email to (the email content can be written with the provided editor)
This is very useful; for example, the admin wishes to automate the email notification (sales, opt-in, etc) to another partner in the business.
Is Systeme IO Free Forever?
Yes, Systeme IO has a Free account which is offered at no cost forever. Users do not need to provide credit card details to sign up for the free account.
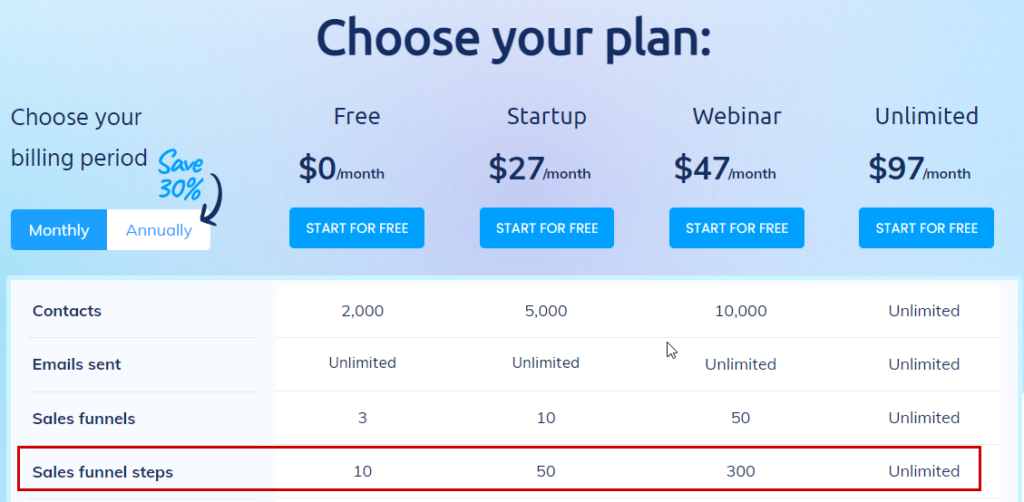
Although it is free, it gives users access to generous features, amongst others accommodating 2000 contacts with unlimited emails sent, 3 sales funnels (with 10 sales funnel steps), 1 course (with unlimited students), and tons more.
Is It Possible To Import 200K Email Contacts To Systeme IO?
Yes, you can import huge email contacts to your Systeme io account. The Systeme io team will contact you to understand the origin of the contacts, i.e., how you build them. You are good to go as long as it is legitimate and not acquired in a suspicious way or unidentified list-building method. Just answer the questions sent by the Systeme team.
Always keep in mind that the verification is to maintain the reputation of the Systeme io platform.
Image Deleted But Still in My Image Folder, Why?
You decide to eliminate the duplicated images in the Systeme io image repository. You select an image to delete and click on the confirmation pop-up window.
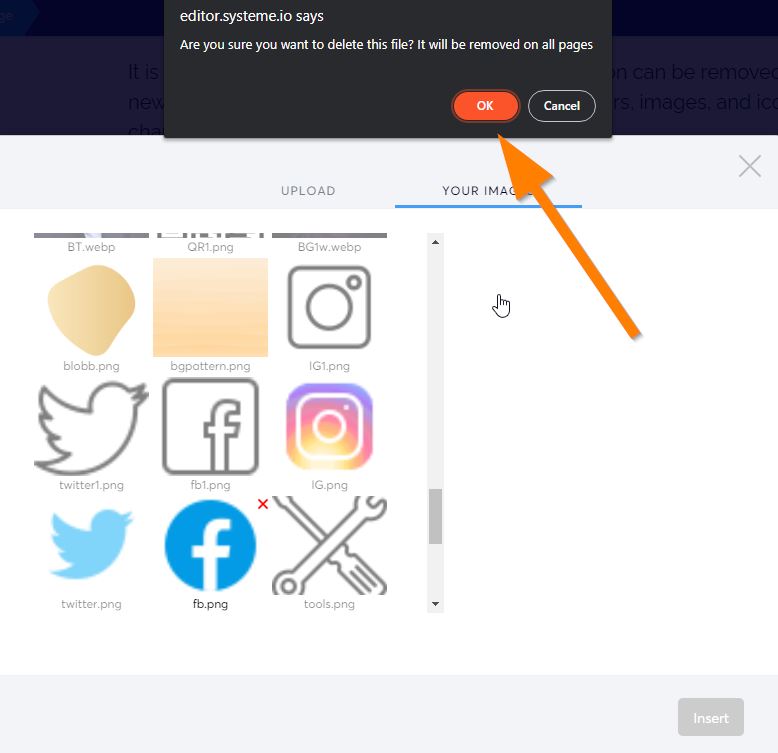
However, you notice the image still appears in the image repository. Does the image get deleted?
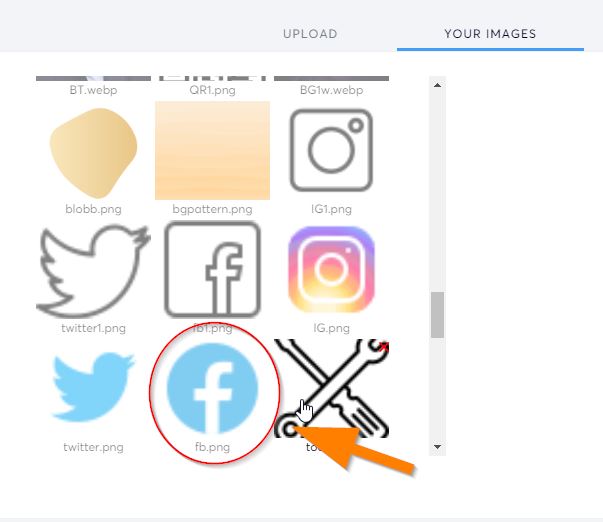
Once you have confirmed the deletion, the image is gone and completely deleted. The reason you still see the image in the Systeme io image repository is because of the cache.
To refresh it and see the updated image repository, you must exit the current funnel and re-enter. After opening up the image repository again, you will have an updated view of your image repository.
I have Added a Custom Domain, But Why do I still Get a 404 Error Page?
After you have added a custom domain to Systeme io, you will need to assign or connect this domain to your funnels before it is ready to use.
Domain Assign in Sales Funnel
In the sales funnel, click on the Settings (top-right)
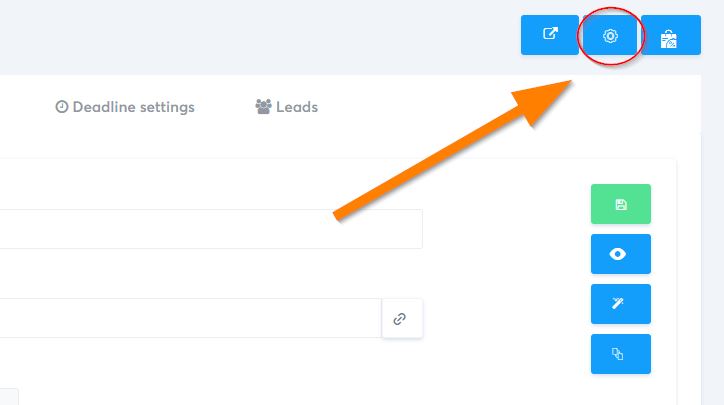
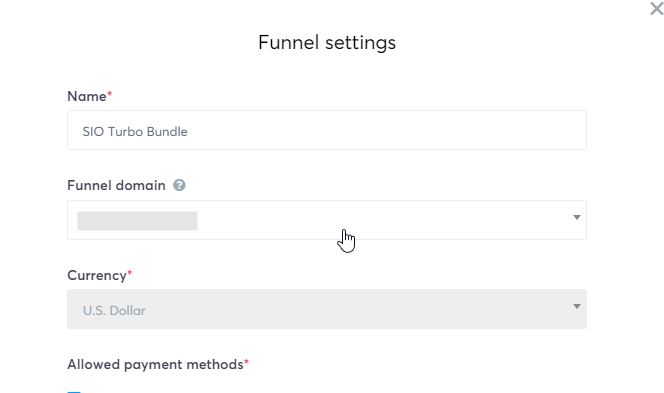
Under Funnel domain, drop down the selection and select the domain you have just added. Remember to save the changes.
Domain Assign in Blog
In the blog listing page, click on the Settings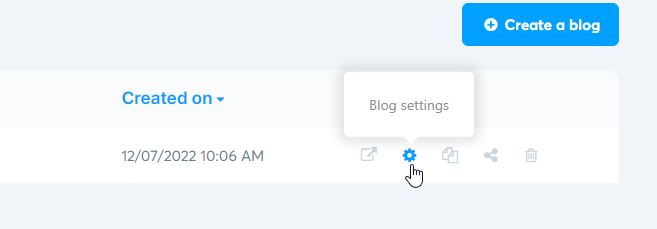
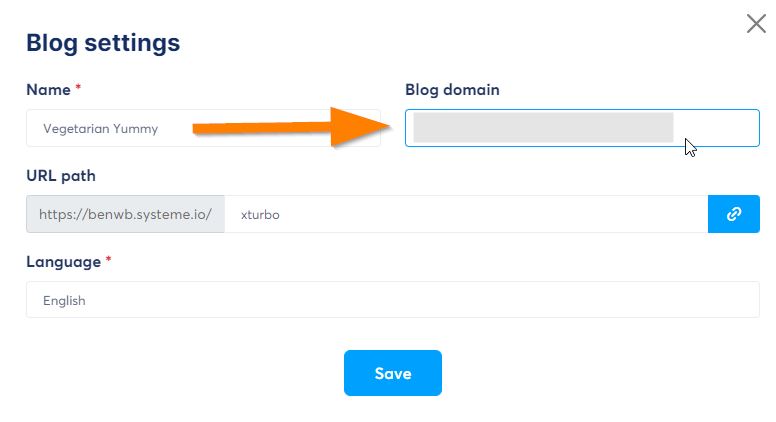
In the Blog domain, drop down the selection and choose the domain you’ve just added. Save the changes.
How To Share Funnel, Blog, Email?
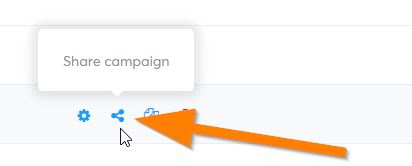
In Systeme io, you can share the funnel, blog, email campaign, and newsletter with others who have the share link.
Share Sales Funnel
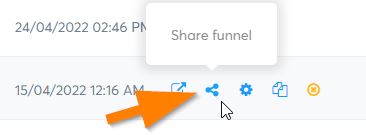
On the funnel listing page, click on the share icon to get the URL you can share with others.
Share Blog
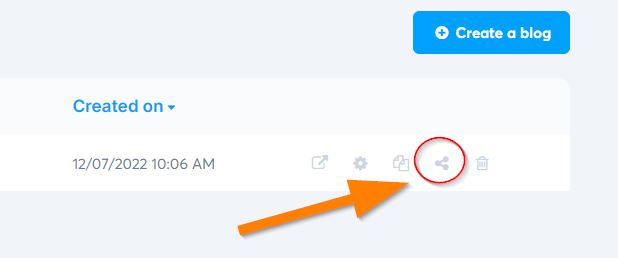
You can also share the blog you created with others. Open the blog listing, select the blog you want to share, and click on the share icon.
Share Email Campaign and Newsletter
Besides the sales funnel and blog, you can also share email campaigns and newsletters.
Open the email campaign or newsletter, and click on the Share icon.

How To Save Systeme io Page As A Template?
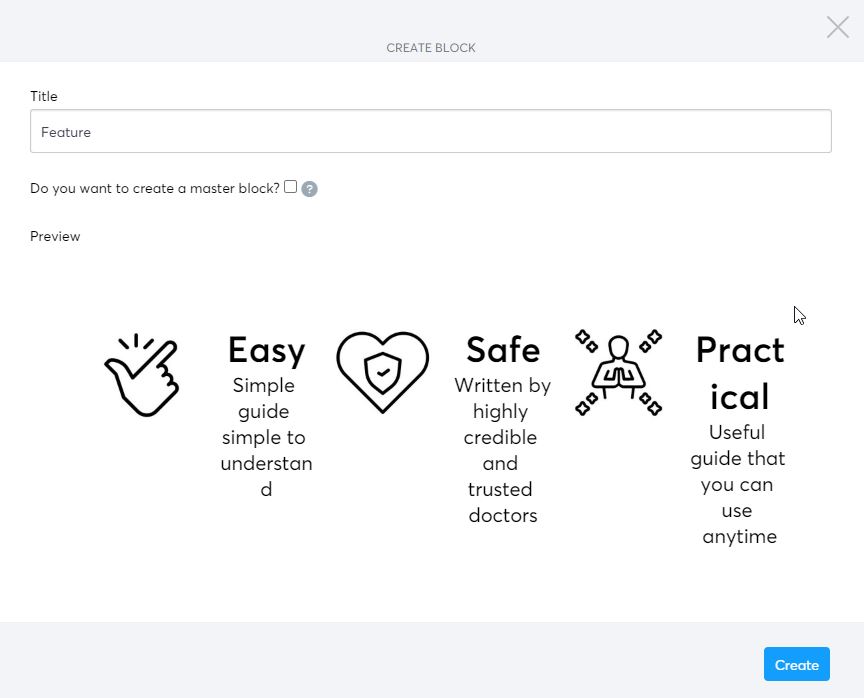
You cannot save the entire page as a template, but you can save any page section as a template (known as a block)
The block can be reused on the same funnel or a different funnel in your Systeme account. And yes, it can be accessed from the blog pages as well.
First, point your mouse to a section (a green highlight indicates a section). Click on the 3rd icon (i.e., the disc icon).

A block creation window will pop up. Enter the Block name or title (this is internal for easy identification later). You have an option to designate it as a master block. Designating a block as a master block means it will reflect on all funnel or pages that use this particular block whenever you make a change. The master block is usually used for the header/footer, opt-in box, and other elements with the same content/layout/design. So designate as master block only if needed and necessary.
Re-using saved blocks
The blocks you saved earlier can be re-used at any funnels within your Systeme io account.
Open up your funnel; on the left, all the saved will go under My blocks. Click on My blocks to expand, and all your saved blocks appear here.

Looking for the block you want can be a hassle if you have tons of saved blocks. Use the “search blocks” to quickly locate the one you desire.

The saved block feature helps save a lot of time. You can re-use the block you have created and probably spend some time on it, on another funnel, or within the same funnel. This is a useful feature you should be making full use of.
How To Make Stripe Test Purchase in Systeme io?
There is no test mode in Systeme (at the moment), so the only way to ensure that your check-out page working as intended is to perform a live test. You can then process a refund to understand how the refund works.
So a live test transaction with the refund prepares you for live customers’ orders. The test will ensure payment can go through; if a refund is required, you will know how to process it.
For a test order, you can set a minimum amount to reduce and minimize costs in case an additional cost is incurred.
How To Make Header Sticky in Systeme io?
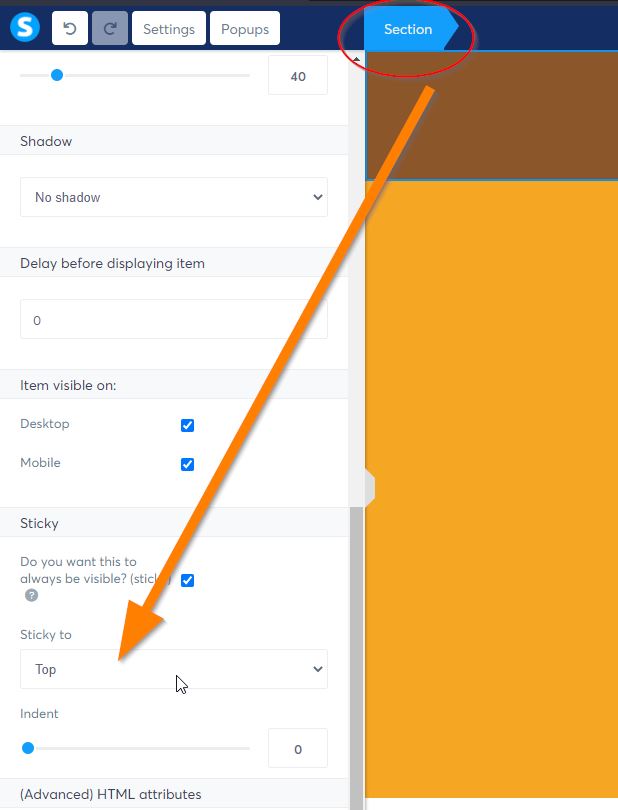
To make the header section sticky, where the header always shows on the page while the user scrolls down, you can enable the sticky option.
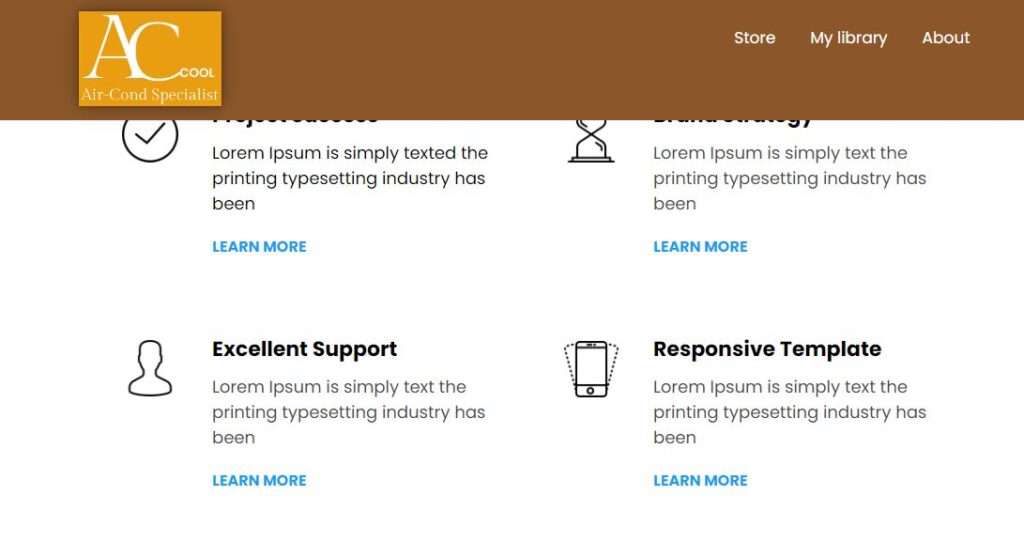
Open the page that you want to edit. Click on the header section to open up its properties on the left. Scroll to the bottom of the settings and tick the Sticky to check box. Select Top.
Save the changes. In the preview or live mode, you will now notice the header will stick in place and always be visible even when you scroll down the page.
How To Know How Many Coupon Has Been Used?
To see the number of coupons that have been used by your customers, from the main menu, go to Products/sales – Coupons.

On the coupon page, you will see all the coupons that you have created (if any).
The column “Coupons Used/Available” shows how many coupon is available, and how many has been used/ 1/10 means a total of 10 coupons are available and 1 coupon has been used by the customer.

How To Find Out If I Have Maxed Out My Startup Plan Limits?
Each of the plans (except the Unlimited Plan) in Systeme has a limit for the number of sales funnels, steps, automation rules, etc that you can create.
If you are in the Startup Plan, the number of Sales Funnels limit is 10. To have an overview of the available quota and how many features quota you have utilized, you can always check in My Plan. Point your mouse to the profile avatar on the screen’s top-right. From the drop-down menu, select My plan.
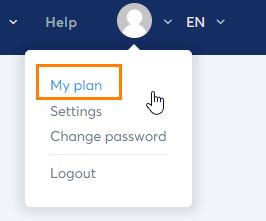
The My plan page will show your currently subscribed plan and the quota you are currently utilizing.
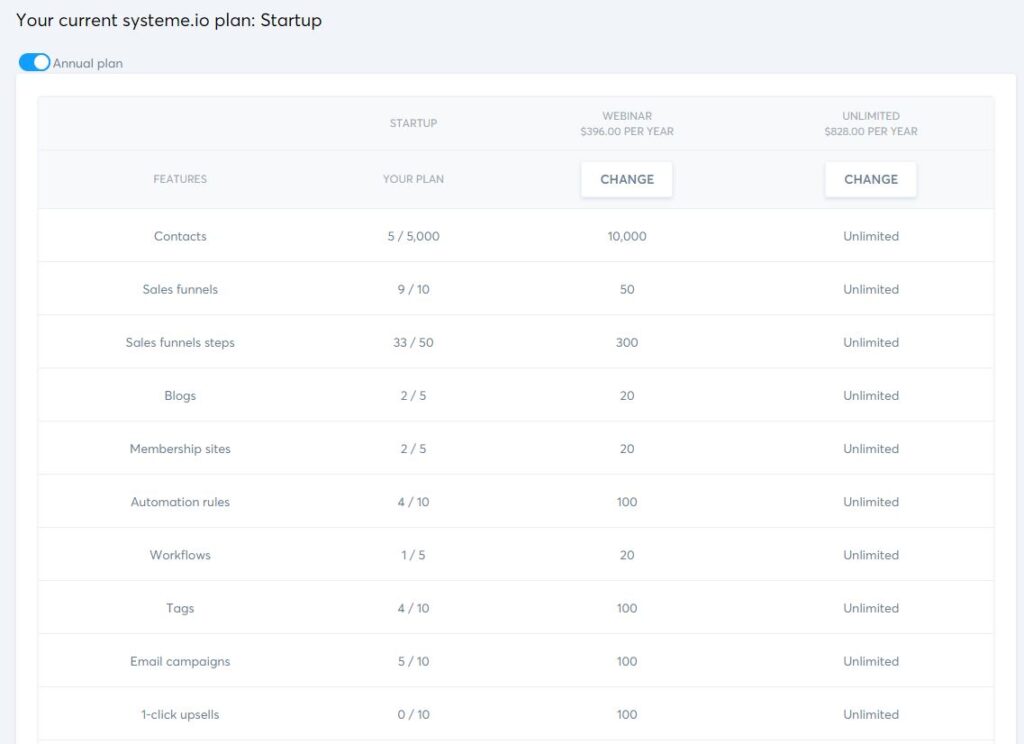
Once you have maxed out the quota given in a particular plan, you can upgrade to a higher plan. The highest plan available for you to upgrade is the Unlimited Plan.
How To Change The Button Color In Forgot Password Page?
Currently, It is impossible to change the color of the button on the “Forgotten Password” Page. The page is part of the system page and is not accessible or editable by users.
How To Add a Clickable Phone Number in Systeme io?
In the hyperlink section: enter your phone number by adding tel pre-text. It is recommended to add a phone number with a proper format that includes the country code, although it may work even without the country code if you are calling within the same country.
Format
tel:+(country code)(area code)(phone number)
Example
tel:+60123456789 (with country code)
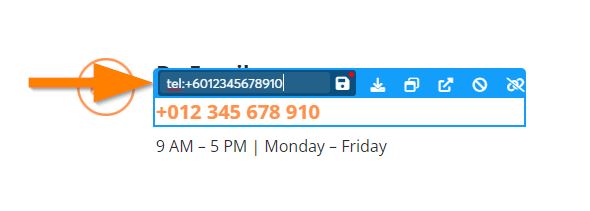
The hyperlink is now clickable and on the phone, it will automatically open up the phone dialler.
How Do I See The Email Addresses of Affiliate Leads That I Referred?
If you promote the affiliate programs in Systeme Marketplace, you will have the choice to promote either the Opt-in page or the sales page.
Whether or not you will have access and the ability to see the leads’ email addresses depends on whether the product owner allows it.
If the product owner allows it, then the lead’s email that you referred will appear under the Affiliate Dashboard (from the navigation menu Dashboard – Affiliate dashboard)
It won’t be shown if the product owner doesn’t allow it.
Why is the leads’ email addresses not in the Contacts section?
The Contacts page only shows the leads or opt-ins you brought in via form subscriptions (i.e., your opt-in form placed on the page).
How Do I Download the Contact List From Systeme IO?
To download or export your contact list in Systeme IO, follow these simple steps:
1. In the contacts page, select the contacts that you want to export (or select all)
2. Scroll to the bottom of the page, and click on Export.
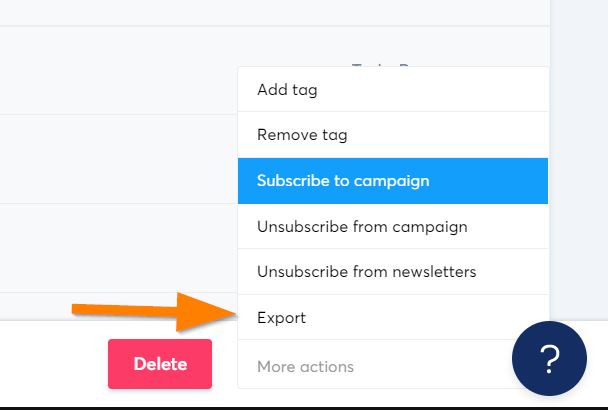
3. Select the column(s) you wish to export and then hit the Export button. A file with contacts will be downloaded. You have the option to select the delimiter if you want (comma, pipe, caret, semi-colon, tilde)
4. An email containing the download link will be sent to you. Click on the link given in the email to download your .csv file. You can open the downloaded file in MS Excel or any compatible program or import the file to your desired software.

Can I Point Domain To Systeme IO While Maintaining Email Hosting in My Existing Web Hosting?
Yes, you can.
First, you have to point your domain to Systeme IO. Refer to the article on how to point the domain name to Systeme IO.
Once you’re done pointing the domain to Systeme IO (i.e., adding a custom domain to Systeme IO), The next step is to set up the domain authentication for email within Systeme IO. The email hosting can be on your existing web hosting company.
In essence, if you have followed the steps above, you have just pointed the domain to Systeme IO so that you can use the domain for your funnels, blog, etc. You then created domain authentication (for email use purposes) to use your existing email (hosted in your existing hosting, e.g., Host ArmadaHost, BlueHost, etc.) so that you can send out emails from Systeme IO.
When someone sends you an email or replies to your email, it goes to your existing mailbox (i.e., the provider who currently hosts your email)
Can I Insert Systeme Pop-up in WordPress Site?
Yes, it is possible.
The pop-up you created in Systeme IO can be used on Systeme IO pages and other platforms such as WordPress. (i.e external pages)
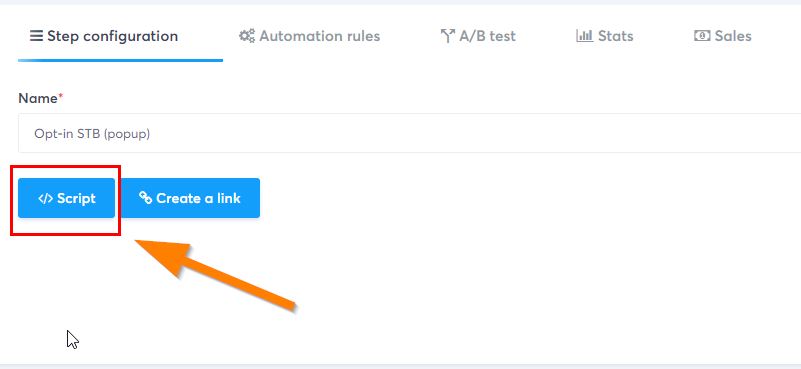
After creating the pop-up, copy the given script (code) and paste it onto the page where you want it to appear.
This feature gives users flexibility, as some people use more than 1 platform to run their business.
Why Systeme IO Imported Page Shown 404 Error?
If you imported the funnel/page via the share funnel link and noticed that the page gives a 404 error when you try to view it, here’s what you need to do.
On the selected funnel step, click on the green save button. Repeat every of the funnel steps you have imported. Then click to view the funnel step (i.e., page), and you should be able to view it.
What is Funnel Step?
In layman’s explanation, a funnel step is a page that web users see in a sales funnel. A sales funnel can have one funnel step, three funnel steps, or even more.
A typical basic funnel consists of 3-4 funnel steps i.e. squeeze page, sales page, checkout page, and thank you page.
Example of funnel steps:
There are 3 funnel steps in this funnel.
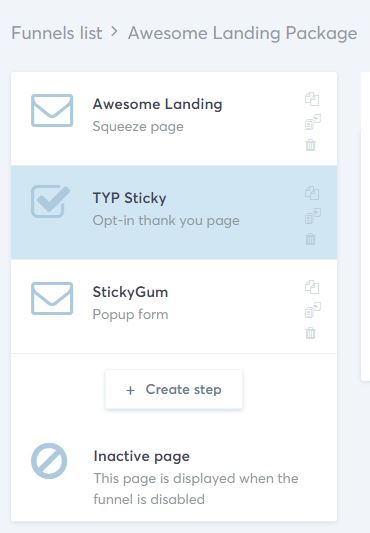
In Systeme io Plans. each plan offers a different number of funnel steps. The Free plan gives users access to three funnel steps which is sufficient for most of the basic funnel setup, while the Unlimited plan provides unlimited funnel steps.
What is “Next Step URL” Action in Button
On the Systeme io funnel page, if the user configures “Next step URL” on the button property, what it means is after the website visitor clicks on the button, it will bring the visitor to the next available page in the funnel step.
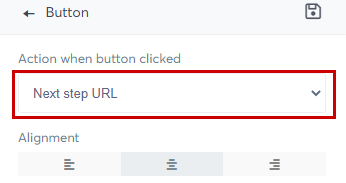
It can be a thank you page, a sales page, or any page in the funnel step.
What if I specify “Next Step URL” but do not have the next funnel step?
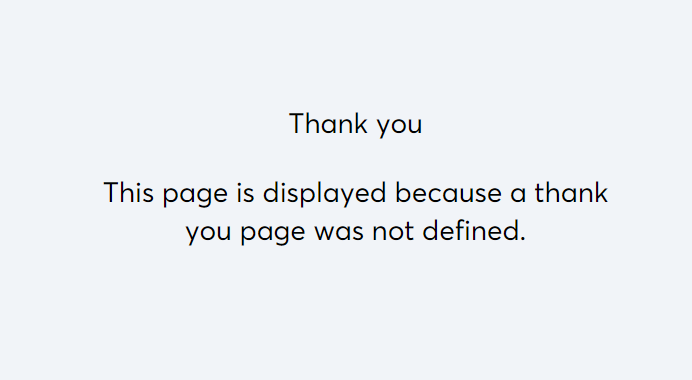
By specifying or selecting “Next Step URL”, you are basically telling the system to go to the next page in the funnel step. If you selected “Next step URL” but do not have a page created in the subsequent funnel step, Systeme io will show your visitors the “page not defined” default page.
What Are the Differences Between Automation Rules and Workflows?
Automation comes in 2 options i.e. rules and workflows.
Rules are simple automation that contains a trigger and an action (or multiple actions).
Workflows are a more complex automation sequence that may contain additional actions, delays, and conditions.
You can learn more in the article how to use Systeme io automation.
I have 2 Order Forms. Do I Need 2 Thank You Pages As Well?
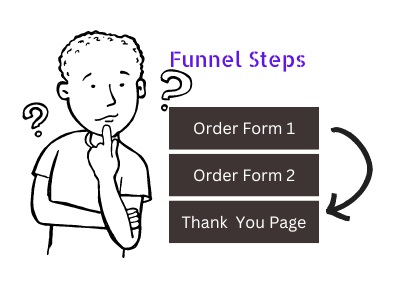
You do not need 2 thank you pages if the thank you page that you have is relevant for both of your order forms.
This is because the way the order form works is to look for the closest upsell or thank you page in the funnel steps.
For example, you have order forms and a thank you page in the following sequence that can share the thank you page. In this case, you need one thank you page.
Order Form 1
Order Form 2
Thank you Page
If the customer made payment in Order Form 1, the system will look for the next upsell or thank you page in the funnel steps.
How To Move, Delete and Duplicate Funnel Steps?
Funnel steps reside within a funnel (or the subset of the funnel)
Just like a webpage in Brizy Cloud, you can create, delete, duplicate and move funnel steps within Systeme io to another funnel (i.e project).
Moving a funnel step
Open up the funnel and point your mouse to the funnel step that you wish to move. Click on the 2nd icon where it says “Move funnel step”.
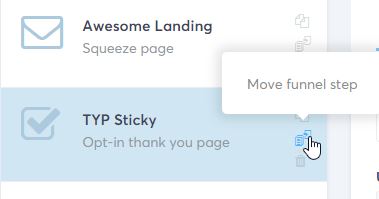
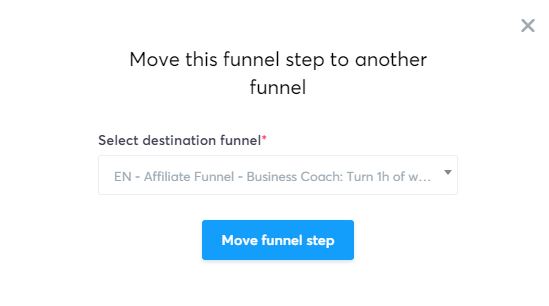
Click on the icon and you will see a pop-up window prompting confirmation of where to move the funnel step to. You can drop down the list and select the funnel (or project) to where you want to move it to. (you will need to create the funnel before it can appear in the dropdown list). Click on the Move funnel step button will move this funnel step instantly and the destination page will open.
Deleting a funnel step
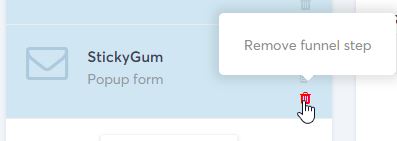
Deleting a funnel step is simple. Point your mouse to the 3rd icon (i.e trash bin) on the funnel step and click the icon to delete.
Duplicating a funnel step
Duplicating a funnel is as simple as moving and deleting a funnel step.
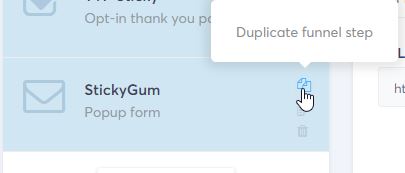
Click on the first icon that says Duplicate funnel step will do the magic. The same copy of the funnel step will be created.
How To Create Privacy Policy, Terms & Service Page in Sales Funnel?
Using the Info Page type, you can easily create the Privacy Policy, Terms and Service, Disclaimer, and other information pages.
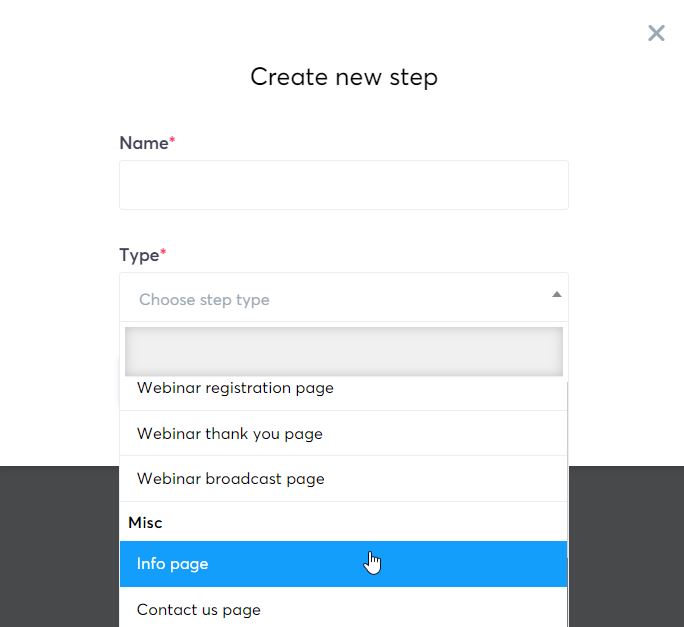
Then you may insert the hyperlink of your info pages using the menu element or manually insert it using the text element and hyperlink it to the info pages you have created.
How Do I Import The Automation Rule in Systeme io?
Unlike the sales funnel, automation rules and workflows cannot be imported.
You can only import the sales funnel, email campaign, blog, and course. Having said that, the automation (rules and workflows) can quickly be set up (i.e., re-create) within the sales funnel itself (under the automation rules tab) or the Automations main menu.
Re-create rules or workflows
The easiest way to re-create the rules or workflows for an imported funnel is to print it out (or capture a screenshot). This allows you to follow the step-by-step entry into your new funnel. It also ensures you do not miss any important rule/workflow step. It also gives you an overview of what tag(s) to create.
Once you have re-created the rules/workflows, check it is correctly inputted. From the menu, go to Automations – Rules/Workflows. Ensure everything is in order so your funnel work as intended.
How Do I Import Systeme io Sales Funnel?
To import a sales funnel to your Systeme io account, first, you will need to get the share funnel link that looks something in the following format
https://systeme.io/funnel/share/45678456hab2f34b90c6763345gtdd1797e52
Click on it (if the link is clickable) or copy the whole link and paste it into your browser. If you have already logged in to our Systeme io account, the import process will be run instantaneously. You will be prompted to log in if you’re not yet logged in to your Systeme io account.

How to happen if I click on the funnel share link twice?
On rare occasions, there is a chance to click on the link twice. If you click too fast (which resulted in clicking 2 times), chances are only one click trigger is sent during the session. When you click on the shared link, Systeme’s funnel screen will open immediately (if you are already in the logged-in session).
Does importing the same funnel overwrite the existing ones?
No, it does not. Importing the same funnel more than once won’t overwrite the existing funnel. It will create a new funnel (thus duplicate).

If your Systeme io account plan funnel steps have hit the limit, then you will get the message.

To avoid wasting your funnel steps quota, use it wisely. As your business grows and you are ready to move on, you can always upgrade to a higher Systeme IO plan (check out Systeme IO Discounts)
How Do I Change the Percentage % of Affiliate Payout?
You can change the affiliate commission and the payout delay in the checkout funnel step (i.e. order form), under the Step configuration.
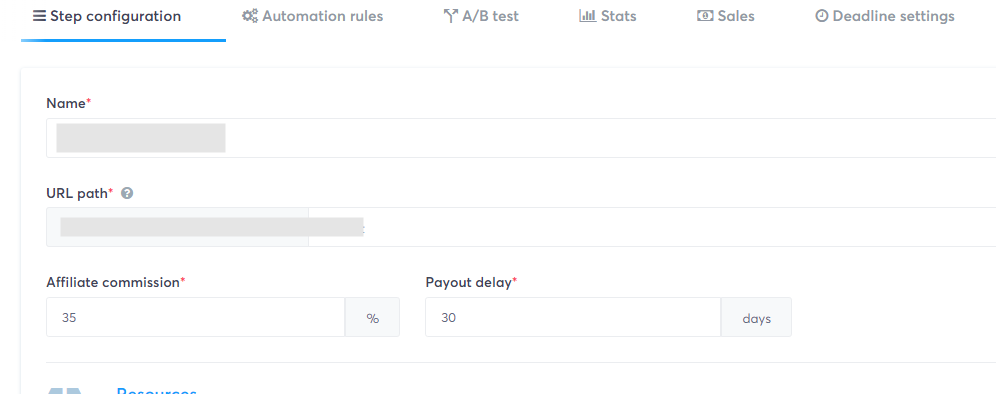
Once changes are saved, they will be reflected immediately from that point onward.
How Do I Change The Currency After Funnel Is Created?
Unfortunately, the currency of the funnel cannot be changed after the funnel has been created. However, there is a workaround.
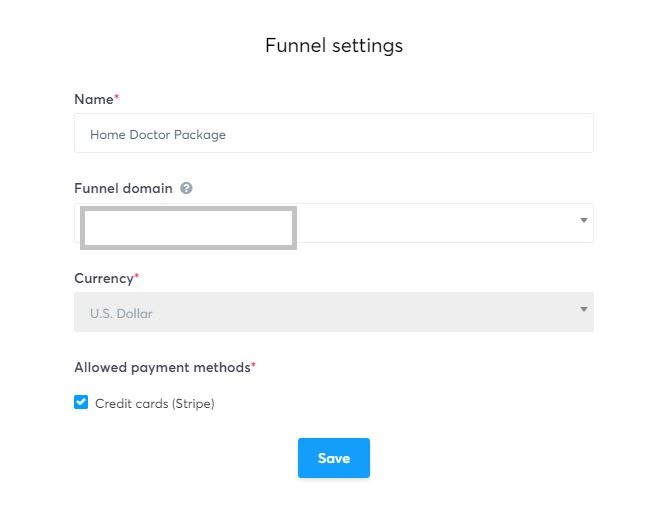
You can create a new funnel with your desired currency. Then move the funnel steps in your existing funnel to the new funnel. You can refer to this article on moving, deleting, and duplicating funnel steps.
How Do I Change Systeme io Page Template?
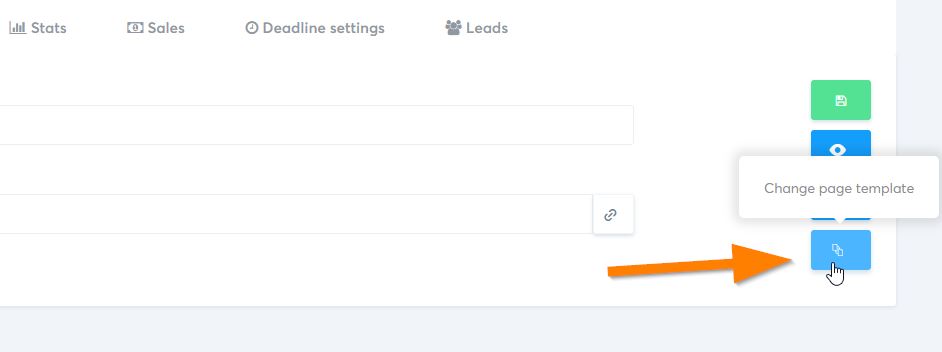
To change your current page template, in the Funnel steps view (pages), select the page and then click on the template icon (as shown in the screenshot).
A confirmation will be prompted. Click Confirm if you wish to proceed.
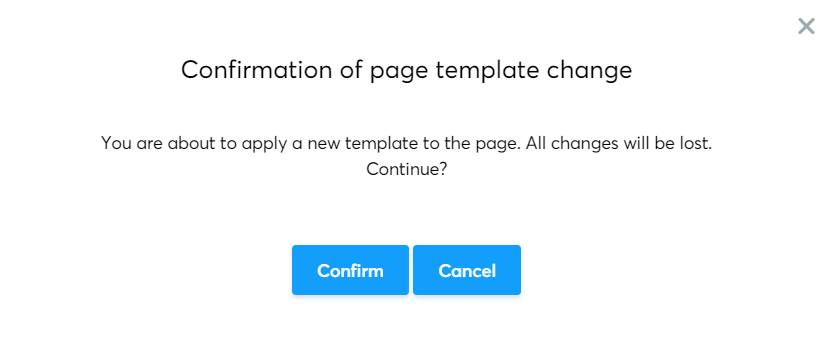
Do note that by changing the template, whatever existing content on your page will be lost and non-recoverable. So proceed with caution.
Why The Quiz Didn’t Show After Students Completed The Lectures?
The quizzes for the online courses are created at the module level. Therefore, students need to complete the entire lectures within that specific module before the quizzes are prompted to the students. else, the quizzes won’t be shown.
Students must click on the “Mark as complete” button at the bottom of each lecture.
When Someone Cancels Their Subscription, Do They Automatically Lose Access To The Course?
Yes, they will automatically lose access to the course, provided that if access to the course was granted by setting a resource on the payment page.
(with automations the access wouldn’t be removed)

What is The Online Course Access Flow For Students?
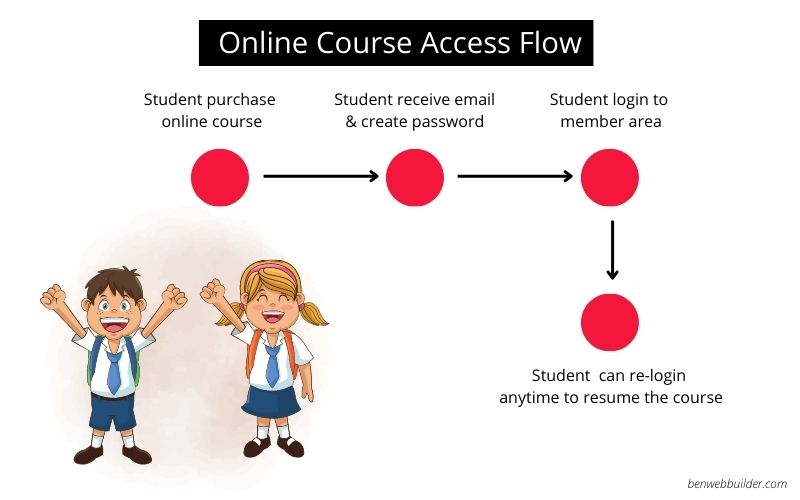
1. The student purchases the online course on the course instructor or vendor’s website.
2. Systeme’s online course system will send 2 emails to the student. i.e. one email consisting of an invoice, and another email consisting of access details. The student is required to click on the link found within the email to create a password for his account access.
3. Once the password is created, the account is active. The student can proceed to log in to the member area to access the online course.
4. The student can re-login to the member area to resume the course anytime by logging in to the student’s Systeme account or via the link sent by the course instructor. Refer to “URL to access online course” and “2 ways to access online course” for more info.
What is The Login URL To Access Online Course?
The direct web address for students to log in is
https://YOURCOURSEDOMAIN/dashboard/en/login
As a course creator, if you are using the systeme.io subdomain, the login URL would be
https://XXXXX.systeme.io/dashboard/en/login
What Happens If I Change The Domain Used For Online Course?
Once the domain (or subdomain) is changed, Systeme io will automatically send an email to all existing students who have enrolled in the course to notify them about the changes that take place.
The students will be given a new URL so that they can log in and access their course.
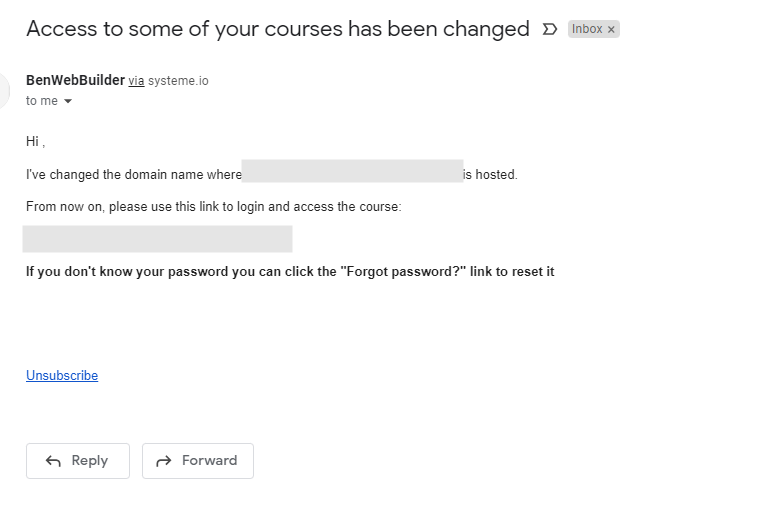
So that point onward, students need to use the new link given as the old one will no longer be workable.
There are other implications of changing the domain (or subdomain), read What happens if I change Systeme’s Subdomain.
User Request For Refund For Subscription, What Should I Do?
The subscription refers to recurring charges for a course, membership, product, or service for a specific duration/period. If you offer a money-back guarantee, here’s what you can do in Systeme io when someone requests a refund.
Step 1 – Process a Refund
The refund will return the money paid back to the customer.
Go to Product/sales – Transactions

Select the transaction you want to be refunded from the list (you can filter the transaction criteria on the left). Click the 3 dots and select Refund.

Confirm the refund.
The Sales Invoice will instantly be converted to a Receipt once you confirm the refund.
Kindly note that the refund should be reflected accordingly in your payment processor. For example, in Stripe, you would see the transaction status marked as “cancelled”.
Step 2 – Cancel The Subscription
Processing the refund will return the fund to the customer. Now, you need to cancel the subscription in your Systeme io account to stop customers from continuing to access or gain future access to your course/content/product/service.
To cancel the subscription, go to Products/sales – Transactions.

Select the subscription that you wish to cancel. Tips: you can filter the subscription from the top of the listing.
Click the two dots located at the far right, and click Unsubscribe.
If you wish to unsubscribe or cancel the subscription only at the end of the subscription period, click “Unsubscribe when subscription period ends”. Otherwise, click on the “Unsubscribe now.”
Upon completion, the status of the subscription will be marked as X.
How To Make All Courses I Created Available In A Single Member Area?
Yes, all your courses will be shown in one place. Your student or member can access the one(s) they bought. For the courses that they haven’t bought, they can click on the “Get Access” button, which will be linked to the course sales page (you can choose the sales page in the “Course settings”)
How To Check If Students Have Completed A Course?
You can check student progress from the menu Products/Sales – Students. You may filter the courses (filter at the top) to only show the student for a particular course.

How To Change Systeme io Button Hover Color?
Currently, there is no option to change text or button hover color. However, there is a workaround by leveraging the CSS. (yes, you can add custom HMTL/CSS/JS code under the settings of your funnel)
If you would like to keep it simple without using CSS, one tip is to avoid using the darker button color so that the text remains visible when mouseover.
Having said that, this is NOT a critical feature, so don’t be too concerned about it as the Systeme io team is continuously working on the improvement. Focus on another important area of your business, especially those related to traffic and conversion. But if you don’t mind doing a little bit of copy and pasting, follow the steps below to change the button hover color.
Use CSS to create a button hover color
1. Get the HEX (eg, #a8763e) of your desired color. You may use color-hex.

2. Copy your button ID attribute and paste it into Notepad. To see the ID attribute for the button, you have first to select the button, and that will show the button properties on the left. Scroll to the bottom to see the ID attribute.

3. Next, add the Raw HTML element. Drag the Raw HTML and drop it on the canvas.

4. Click on the Raw HTML element on the canvas, and on the left, click on Edit code

5. Insert the following code in the HTML code area. Replace the button ID attribute with the button ID attribute you copied earlier. Change the button background/border color with your desired color.
<style> #button-949c0016:hover { background-color: #2EFF2E; /* Green */ border: 2px solid #2EFF2E; color: white; text-decoration: none; display: inline-block; transition-duration: 0.4s; cursor: pointer; } </style>

6. Save the changes.
How Does Student Access To The Online Course?
There are two ways in which students can access the online course.
1. Via student dashboard in the student’s Systeme io account.
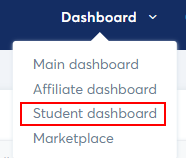
2. Via direct access link provided by the course instructor.
Does User Need To Sign Up for Systeme To Enroll In My Course?
No. Signing up for a Systeme io account is not required.
The student enrolls in your course either by (i) going through the sales funnel you created(where you assign them to the course automatically), or (ii) you can add them in manually, depending on your preference.
Systeme io Navigation Menu
If your student is not an existing member of Systeme io (student accounts), they won’t see the top navigation menu. When they log in to their course/member area, all they see on the header are the Profile Settings menu (with change password, logout) and the language option on the right.

However, if the student is already an existing Systeme io user (regular user account), the student will see all the navigation in Systeme io as usual.

Explain “At Least One Email Input Is Required” Error
When you try to save your page, you get the error that says, “At least one email input is required on this page”
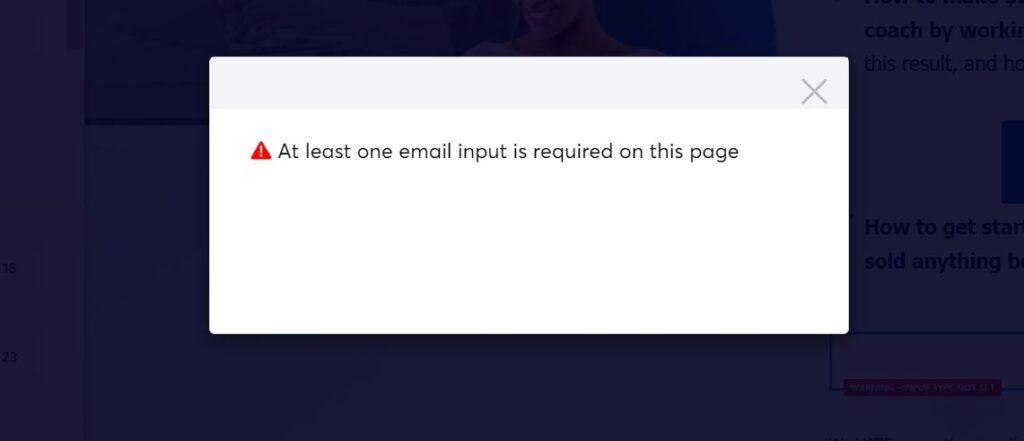
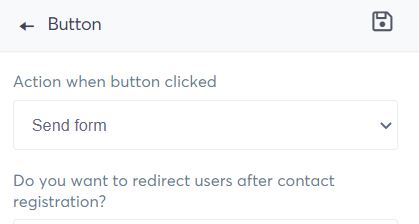
This happens because you have one or more buttons on the page with the “Send form” action set. However, there is an issue with the input field.
Either the input field does not exist (no form input) or,
The input field is on the page, but the input type was not specified.
So make sure that if your goal is to collect visitors’ details, the input form must be present on the page, and the input type must be set. This error should be prompted only if you use the “Send form” action on the button.
Can I Replace The Custom Domain Anytime?
Definitely. If you are running out of the custom domain quota or want to change to a new domain name, just delete the existing one and simply add a new one.
What happens to the existing funnels with the deleted domain?
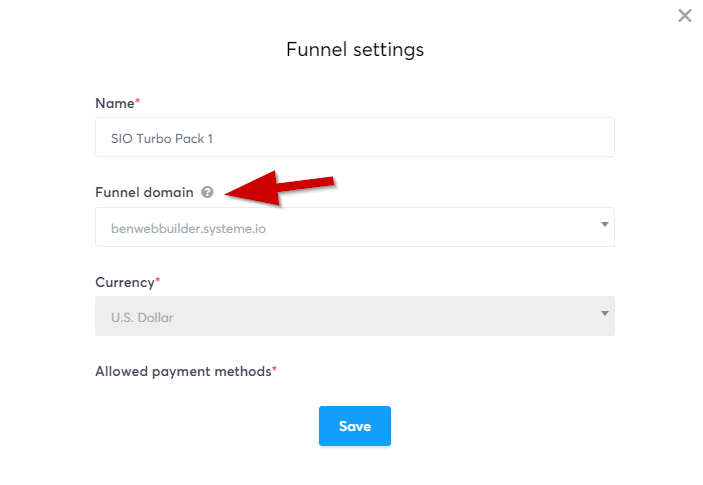
Your existing page will automatically switch back to using the default systeme.io sub-domain. Once you have added your desired new domain, just go to Funnel settings to change the domain back to your domain.
Can I Use a Different Sender Email in Systeme io?
The email address you used to send outgoing emails from Systeme io doesn’t need to be the domain you pointed to Systeme io.
For example, you have a domain name xyz.com pointed to Systeme io, and you wish to use [email protected].
That’s possible. you just need to go to the navigation menu Settings – Mailing settings and add the new domain for authentication. You may add more so that you can use multiple sender emails.
(note that you can authenticate multiple domains and use the domain emails you have authenticated to send out emails from your Systeme io)
Once you have done that, you can start using the email (that you already have) by inputting the email address as “Sender email address”
Can I Use Gmail Address To Send out Emails with Systeme io?
Since September 2022, Systeme io has allowed users to use Gmail addresses instead of professional email. You just need to enter your preferred Gmail address into the “Sender email address” field.
Do take note that using professional email (i.e. email address using your own domain name) is still recommended instead of using Gmail.
Be warned, though, do not spam as the Systeme io team is watching closely.
Can I Use Subdomain on Systeme io?
Yes, Systeme io supports both domain and subdomain. If you already have a domain used for another purpose on the root level (eg, mydomain.com), you can use your subdomain in Systeme io. Just point the subdomain to Systeme io (eg, subdomain.mydomain.com).
Does Adding Subdomain Take Up My Systeme’s Custom Domains Quota?
Yes, domain and subdomain are treated the same. When you add a subdomain to your Systeme account, it will deduct your custom domain allowed quota. For example, the Startup Plan for Systeme io allowed three custom domains. Assuming you add 2 subdomains and 1 domain, that will max out the given quota in the Startup Plan.
How Do I Allow My Affiliates To See The Email They Referred?
As the product owner, you have control over whether or not to allow your affiliate to see the lead’ email that they referred.
Under Settings, go to Affiliate program settings
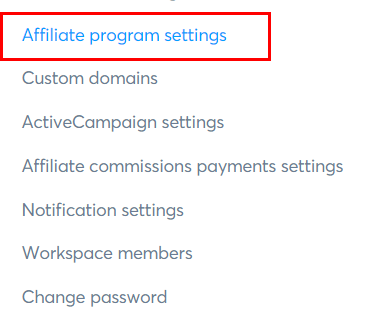
At the bottom, check the box that says “Allow your affiliates to view the email addresses of the leads they’ve referred”
Remember to save the change.
How To Add Custom Field in Systeme io?
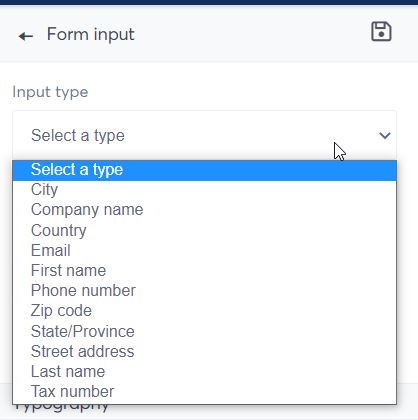
The default form input type in Systeme io is limited to mostly address fields such as Street address, state/province, zip code, phone number, name, etc.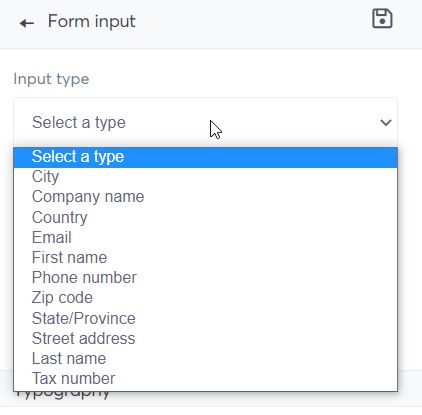
It is possible to add a custom field on the contact page.
Steps to add custom fields
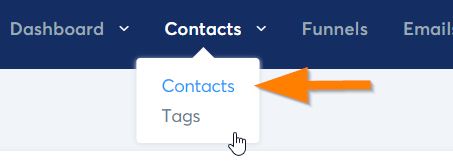
1. From the navigation menu, go to the Contacts – Contacts
2. Click on any existing contact to open the contact page. (if you do not have existing contact, just add one manually by clicking on the “+ Create contact” button located on the top-right)
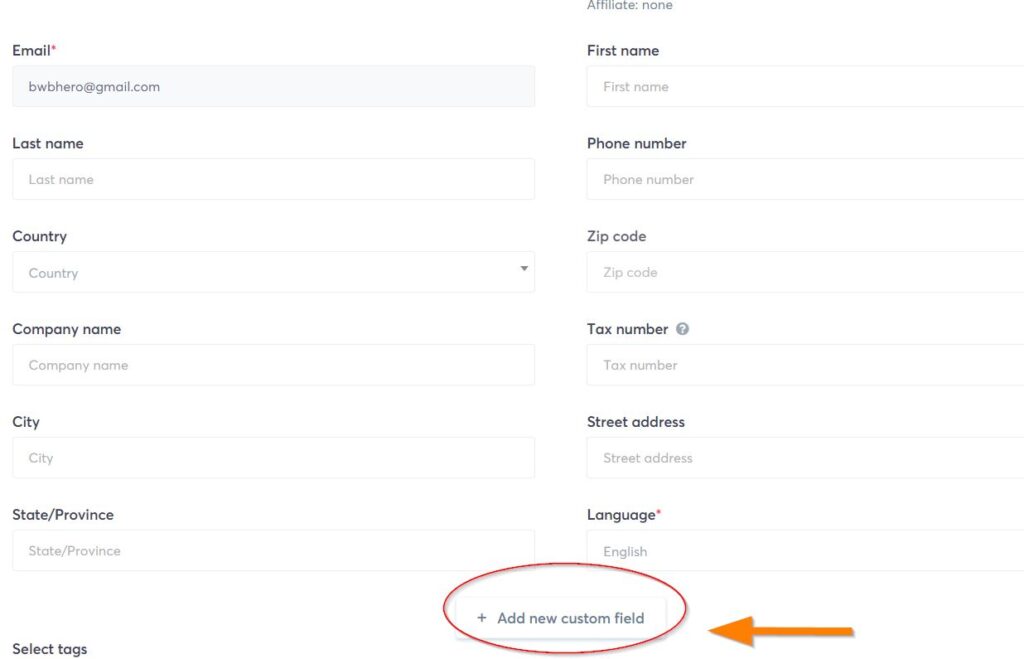
3. On the contact page, scroll down to the bottom until you see a button that says “+ Add new custom field”
4. Enter the Name of the field (this will appear as an input type when you build the form later), Select Type as text
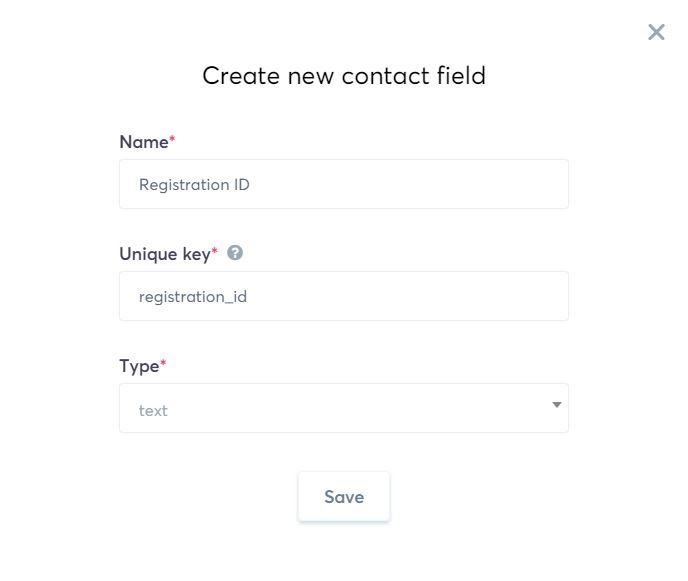
5. Remember to save the custom field.
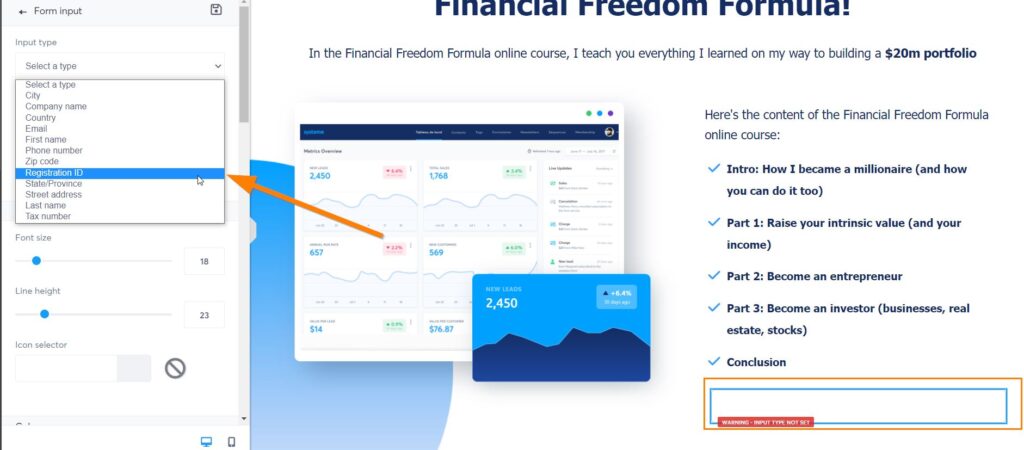
6. Now if you go to your editor and insert the Form input element, you can select the custom field you just added.
How to delete the custom fields?
To delete the custom field, go back to the contact page. Click on any contact and hit the trash bin.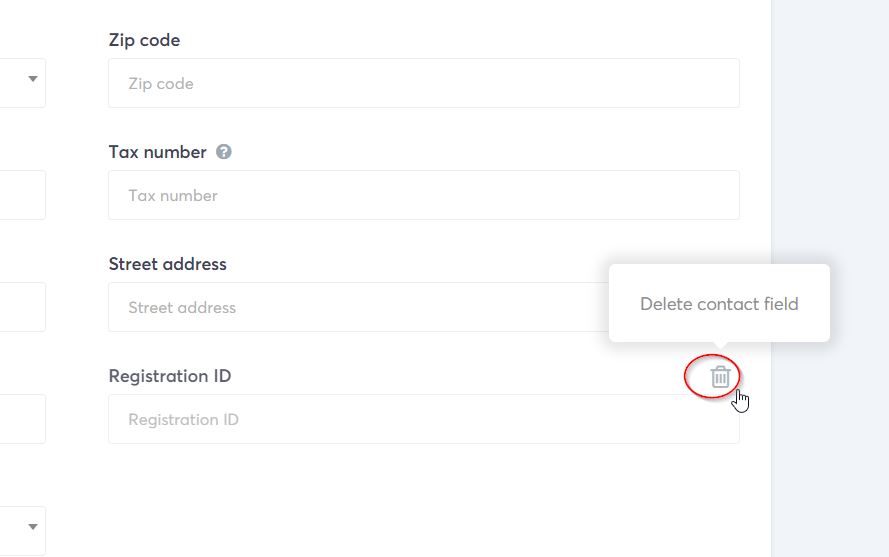
How To Authenticate Multiple Custom Domains For Email?
Just like adding multiple custom domains (for paid plans in Systeme IO), you can also set up multiple domain authentication to improve email deliverability.
Go to Settings – mailing settings.
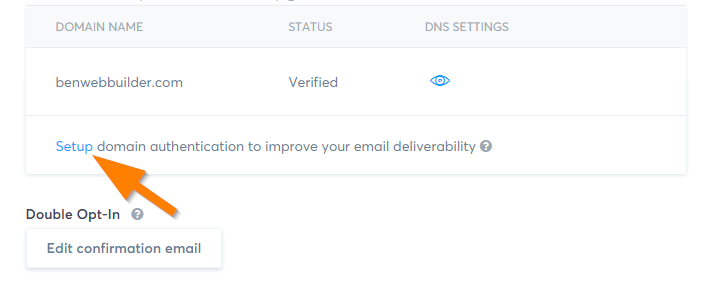
Click on the Setup domain authentication and follow the on-screen instructions to submit the domain to authenticate.
You will get the records (unique to you) to add to your domain registrar (or any site you bought the domain from). Take note that you only need to enter the ones underlined in red.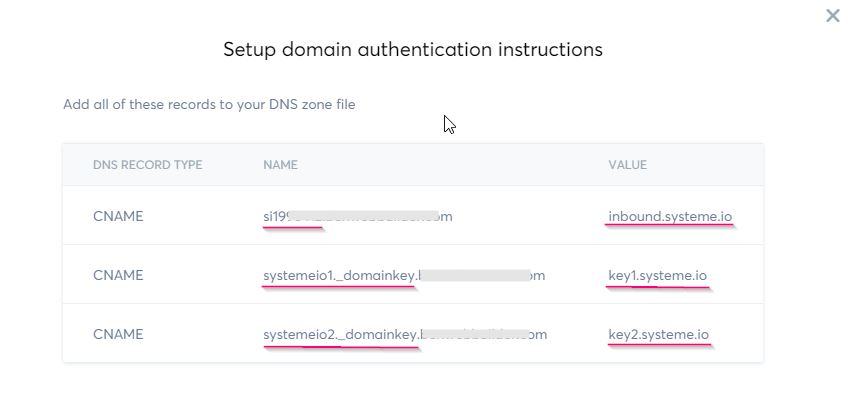
It may take hours to complete. Once it is done, you will see the status below.

Contact the Systeme IO support team if the status is still pending after 1-2 days.
How To Change Systeme io Course Instructor Picture?
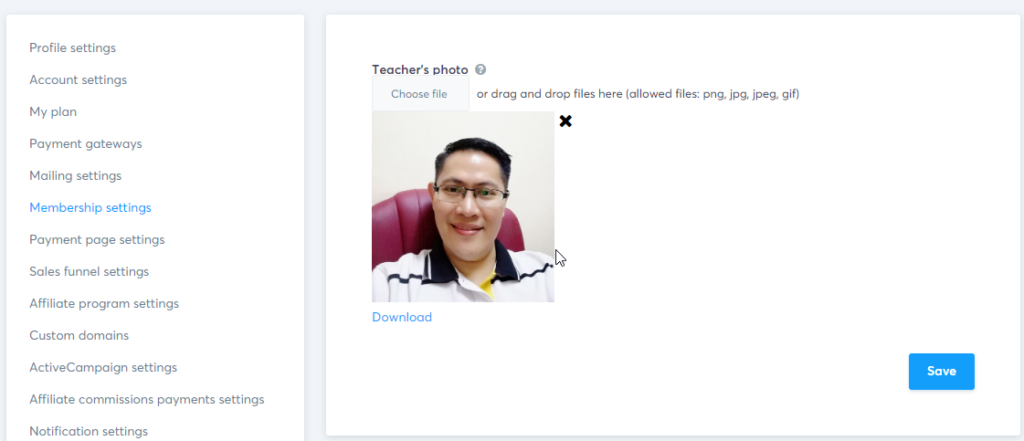
To replace the default avatar for the online course so that it shows your picture on the lecture pages, head over to the Systeme IO Settings – Membership Settings.
The picture extension supported are jpg, jpeg, png, and gif, which are the common file extension used. If you are using .webp or any other extensions, you must convert to the allowed format before uploading it.
If you want to change the vendor’s picture or Systeme io profile picture, refer to this article.
How To Hide Sent With Systeme.io Affiliate Link in Email?
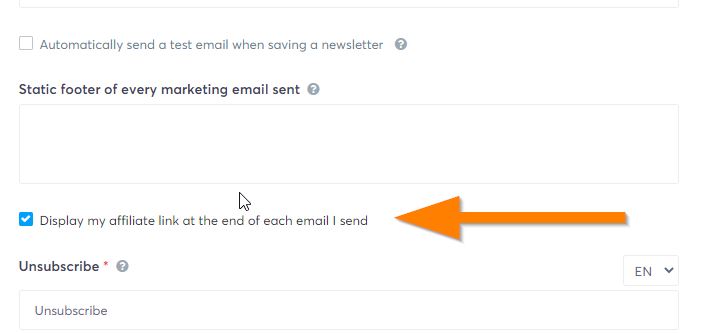
The Sent with Systeme.io is enabled by default and will appear at the bottom of outgoing emails. It is tagged with your affiliate link so that whenever someone clicks and buys a subscription, you will get a commission (a lifetime, recurring commission!)

You can hide the “Sent with Systeme.io” label by going to the following navigation menu (Settings – Mailing settings).
Scroll down to the bottom of the page and look for the option “Display my affiliate link at the end of each email I send”, untick the box and that will hide it in every email that you send. Do note that, if you are on the free Systeme io plan, this option is locked and it cannot be unticked.

How To Insert Business Logo on Email Footer
You can use the Systeme io Static footer to insert the logo automatically into all outgoing emails.
First, go to “Settings – Mailing settings.”
Next, under the Static footer, insert the HTML code which includes your logo image path. (read below for more info on the image path)
Read
You may copy and paste the code below (remember to replace the image source with your image file path)<img src="your image source goes here" alt="BWB" width="200" height="200">
How to get the logo image path?
“your image source goes here” refers to the image path, i.e., the location of the image.
If you have web hosting, you may upload it to an image folder in your web hosting. However, if you currently do not have web hosting, you can upload it to systeme io. Here’s how to do it:
Open any funnel page (for temporary usage, you can delete this funnel once the image upload is done), select an existing image, or insert a new image element. Click the image upload icon and upload your logo (or select from the existing image)

Then right-click your logo and copy the image address. The image address you copied is the image path.

How To Insert Favicon To Your Systeme IO Pages
To replace the default Systeme “S” favicon with your branding favicon, follow these simple steps:
1. First, you need to generate the image to be used with a favicon. The ideal size is an image with a dimension of 32×32 pixels.
2. Go to https://favicon.io/favicon-converter/ and upload your brand or product/service logo to generate the favicon.
![]()
3. Once done, click the Download button to save the generated favicon zip file to your local drive. (note: The generated icon consists of multiple favicon images in different resolutions. You just need the 32×32 pixels favicon and can safely ignore the rest)
![]()
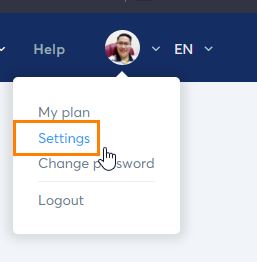
4. Now, insert the favicon into the pages. Log into your Systeme IO member area, and go to your profile image. From the dropdown, click on the Settings
5. Click on Custom domains. In the right panel, select the domain or subdomain you want to insert the favicon. There is an option called Favicon. Click Choose File and upload the 32×32 favicon you generated earlier.
![]()
6. If you refresh your pages, you should now see the favicon showing up.
How To Insert or Upload Image To Email
To insert an image in your email content in Systeme io, you must click on the Image icon and upload the image/photo you want to insert from your local computer.
Click on the Upload Tab and select your image file by clicking on the “Choose file” button. Then, remember to click on the “Send it to the server” button.

Your image will then be inserted successfully.

How To Point A Domain To Systeme IO?
In case the domain name that you own is in use, and you are wondering if you need to point a domain, first check out should I point my existing domain name to Systeme IO.
You can point a domain you own to Systeme io, regardless of whichever domain registrar you use (e.g., Godaddy/NameCheap/BlueHost/Cloudflare/etc.).
First, go to Settings – Domains
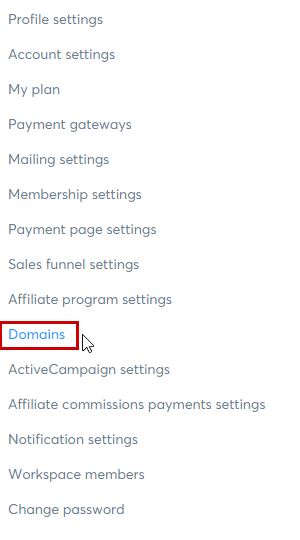
Click on the Add Domain button.

And enter the domain name you want to use with Systeme io.
The DNS configuration will be shown. These are the settings you need to enter in your domain registrar (or wherever your domain is bought and hosted)
In essence, you need to create 2 CNAME records. Enter the first CNAME (with host 1 and value 1) followed by the second CNAME ((with host 2 and value 2). Kindly note that for the Host, you only need to enter the one underlined in red. You do not need to enter the ones without underlines.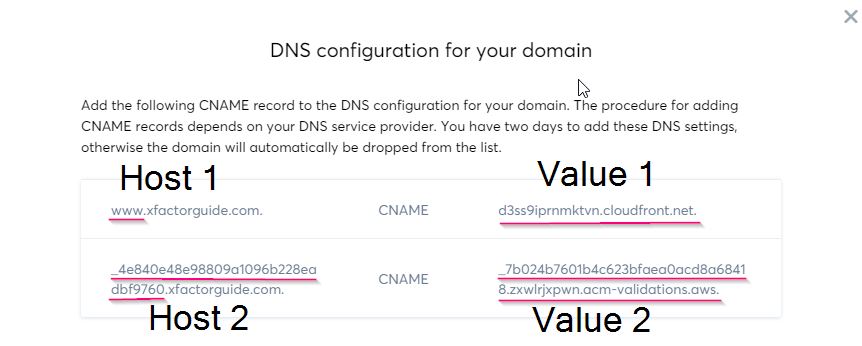
(Important: for Value, remember to include the dot or period (.) at the end of the value. Omitting the dot will result in an error)
Configure The Host and Value in NameCheap
Regardless of the domain registrar that you are using, you can set the CNAME in your registrar.
If you’re using NameCheap, login to your account and under Domain List, click your domain. Change the Nameservers to NameCheap BasicDNS.

Click on the Advanced DNS. Click on Add New Record and that will open up a selection of available records.

Select CNAME Record

Copy the Host and Value that you got from Systeme io earlier and paste in the NameCheap CNAME record. You will need to add two CNAME records.

Redirecting domain
In addition to adding two CNAMEs earlier, you will need to add one more for redirection purposes.
If you skip this process, your website won’t be accessible when someone types yourdomain.com. This process ensures your website is accessible when someone types your website address with or without www.
In NameCheap, DNS section, first add a new CNAME record and then enter your domain in the Host ,and the first DNS as given in Systeme io (Settings – Domains – under your domain you’ve added, click on “show instructions”)
Then save the changes (click on the green tick)

Adding CNAMEs and redirecting is pretty same for other domain registrars (including Cloudflare). As a rule of thumb, look
for DNS or advanced DNS.
DNS Resolve
While you are working on updating the DNS, the status of the domain you just added will be shown as pending validation. Once you have done, check back in a few hours, but do note that it may take any time from 24 – 48 hours for the domain propagation to complete.

The status will change from “Pending validation” to “Ready to use.” once the domain has propagated. If, after 48 hours and status is still showing as pending, check back to ensure you have copied and pasted the correct value. You may want also to check out “I Point A Domain From Cloudflare and Still Pending“)
How To Remove Affiliate Badge?
Remove affiliate badge from webpage
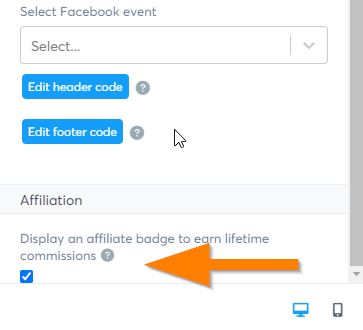
To remove an affiliate badge from your web page, such as on the sales funnel, open the page and click on Settings.
Scroll down to the bottom and look for Affiliation. Uncheck the box, and save the changes. The affiliate badge will be removed from your webpage.
Remove affiliate badge from email
To remove the affiliate badge from the email, go to Settings.

On the left menu, click on the Mailing settings, and scroll down you will see the affiliate link checkbox. uncheck the box and save the changes.
How To Set My Domain As Default
To set your domain as default so that it will be selected automatically every time you create a new funnel, follow these simple steps:
First, go to the Settings page (located at the top-right dropdown), then select Domains from the left options.

Next, Check your domain (make sure it shows a green tick), making it the default domain.

I Have An Empty Email Campaign with Leads. How Do I Send Email?
The situation: You already have leads in your email campaign, and your campaign is empty with zero follow-up emails.
Since your subscribers have already subscribed to your campaign (i.e., by the automation rule you created for the funnel), you can add follow-up email sequences within the campaign (i.e., emails 1, 2, 3, etc.) and set the email delay accordingly.
Once you have done that, the first email will be sent out instantaneously (provided that you set the email delay (of the first email) in the sequence to 0). The subsequent email will be sent out depending on the email delay that you have set.
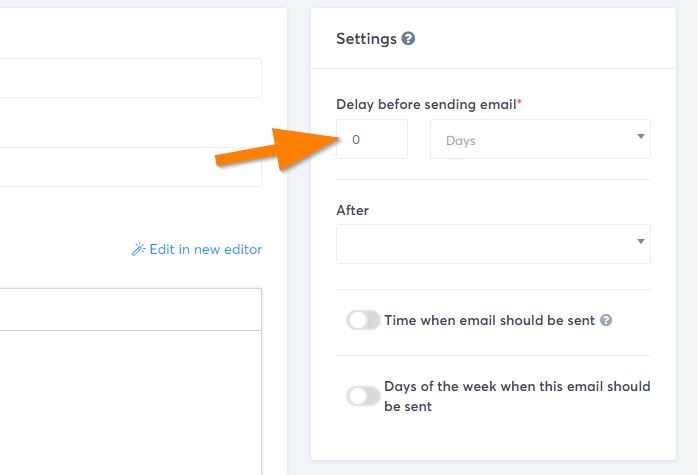
If you would like to send a one-time email, you may use Newsletters (instead of Campaigns)
I Point A Domain From Cloudflare and Still Pending
If you add a domain or subdomain to your Systeme io account by pointing it from Cloudflare, and the status in Systeme io is still shown as “pending validation”, check the following:
1. Make sure the CNAME values are entered correctly in your Cloudflare DNS, whereby you should copy only the values underlined in green.
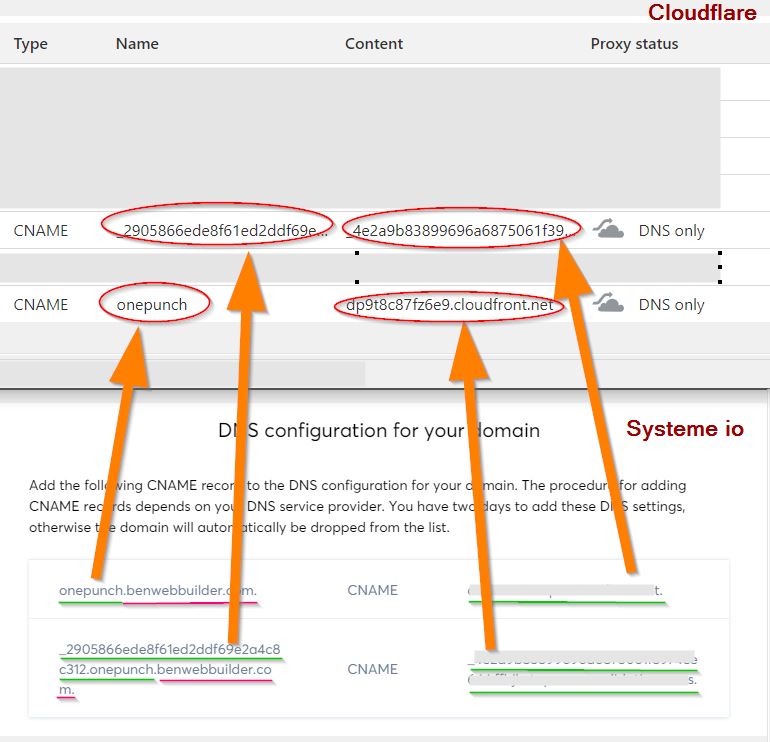
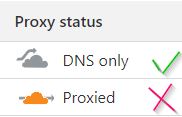
2. Make sure that the proxy status is set to DNS only.
If you made any modification above, kindly give it another 24-48 hours, and if the problem persists, contact Systeme io support for further assistance.
My Squeeze Page Did Not Capture Subscriber’s Email
After the user enters their email address and/or other details on the form and submits it, the user details should appear under the Contacts page (under the menu Contacts – Contacts)

If the user details were not captured, chances are the “send form” action was not set.
How to set the Send form action?
First, open the page where you place the email capture form. Select the button by clicking on it. You will see a thin border highlighting the button.
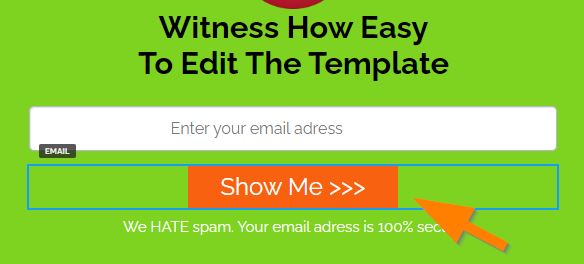
On the left, you will see all the available button properties.
For the button action, drop down the selection box and choose “Send form“. That will save the email (and or other details the user entered) into the Contacts.
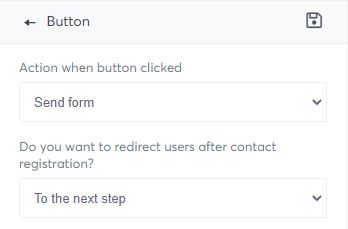
Remember to save the changes.
What Happens If I Change Systeme io Subdomain?
You can change your Systeme’s Subdomain under the Account settings anytime, and published pages, whether it is in blogs, funnels, or any other pages in your Systeme io account, will be reflected immediately.
Is it a good practice to change the subdomain (or domain)?
Changing the subdomain is not recommended unless you take care of the Search Engine Optimization (SEO) aspects. Search Engines like Google may already have indexed your page with the subdomain you used earlier. When you change to a new subdomain, it will not get updated instantly in Google’s cache.
Likewise, your visitors or prospects may have bookmarked and already remembered the link to your pages using the subdomain you used.
The old page will be dead and cannot be found by changing to a new domain unless you properly redirect the old page to the new page.
If you run an advertising campaign (eg, Google Ads, Propeller Ads, etc.) that directs users to your Systeme’s pages, you want to pause your advertising campaign first.
What Is Disable Vertically Stacking Rows Feature in Mobile View?
When you view the row settings in mobile view, you will come across a feature that allows you to “disable vertically stacking rows on mobile devices”.

When you select (tick the box) this option, the system will NOT auto stack rows vertically. In most cases, you want to enable this feature (which means you leave the checkbox unchecked). Unlike the desktop view, the mobile viewing area is smaller, therefore systeme io, by default, will automatically stack the rows together when users view on mobile devices.
For example, this website has a row with 2-column. This is what it looks like on desktop view:
When switching to mobile view, this is how it appears by default:

The above is with vertically stacking rows featured enabled (by default). Notice how the left column (the women’s image) and the right column (the text) are vertically stacked.
If you checked the box (disable vertically stacking rows), here’s what it looks like in the mobile version:

It may appear okay in the screenshot above, but when viewing in the mobile screen, the whole appearance doesn’t look very good.
So, the rule of thumb is always to leave this box unchecked unless you are sure it looks better and proper without stacking the rows.
Why Is My Website Not Indexed In Google?
By default, the new pages and posts created in Systeme io have the noindex tag enabled.
In layman’s, it basically tells search engines to not index the page. Page indexing is a process where search engines like Google add pages to their database. When the page is not indexed, it simply means the page is not in the database and hence it won’t appear in the search engines (i.e SERPS).
To tell search engines to index the page is simply by disabling the noindex tag.
How To Disable Noindex in Systeme io
To disable or turn off the noindex tag, first open your page or a post
Then, on the top-left, click on the Settings
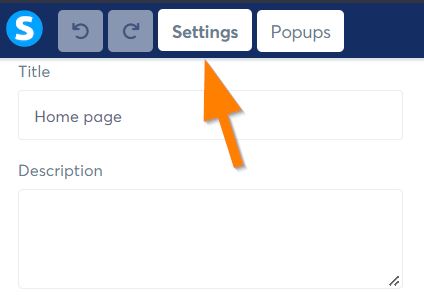
scroll down to the bottom, and look for “Hide from search engines”. Uncheck the box.
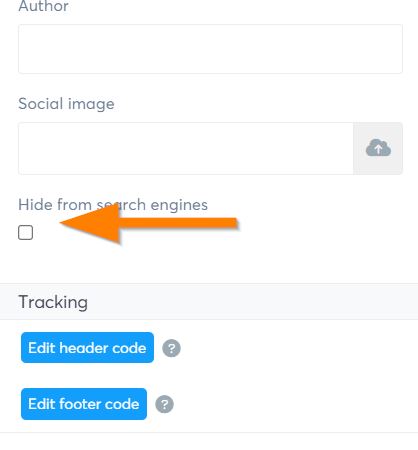
Save the changes to the page.
Why Systeme io is better than WordPress for newbies?

WordPress is probably the most well-known CMS in the world. It is flexible with the availability of various WordPress is probably the most well-known CMS in the world. It is flexible with the availability of various types of plugins. However, in terms of usage, it is probably NOT the best option for newbies or those who are not technically inclined.
To create and manage a self-hosted WordPress, there is more to know than buying hosting, doing the setup, and installing the themes and plugins. Users must also take care of all possibilities and technical issues with WordPress. There are various possibilities for why a WordPress site might stop working. It could be due to plugins or theme files clashing, accidentally deleted system files, or the site being hacked.
Users need to ensure that their WordPress security is in top condition, as any loopholes or outdated plugins/themes may cause their site to get hacked.
The time spent learning and going through the trial by error is too much. Newbie users are better off starting with a ready marketing platform where they can just log in and use it immediately without worrying about the platform breaking or security issues.
Thus, the hosted platform is preferable. Systeme IO is one of the best all-in-one marketing platforms.
What is the Best Alternative To Clickfunnels?
Possibly the best alternative to Clickfunnels is Systeme IO.
Systeme IO is an all-in-one marketing platform that can do what Clickfunnels does. The high ratings given by independent users worldwide reflect why this platform is a solid and preferred marketing platform.


The price is highly justifiable compared to Clickfunnels, with a paid plan starting at $27/month, which includes all required components to run a business. (as a comparison, Clickfunnels 2.0 is reported to start from $147/month). Systeme io allows users to create sales funnel, build blogs and websites, run online courses (i.e., membership site), evergreen webinars, manage affiliate programs, and sell products, with email marketing and automation built-in.
This makes Systeme io the most trusted, preferred, and reliable platform not only as a Clickfunnels alternative but also as the best replacement tool and alternative for Kartra, Leadpages, Unbounce, Landingi, GrooveFunnels, Builderall, and other marketing platforms.
If you are considering WordPress, check out this FAQ article – Why Systeme io is better than WordPress for newbies?
How To Get Clickbank Affiliate Link?
If are you new to Clickbank, first sign up as Clickbank Affiliate by heading to https://www.clickbank.com/affiliates/. Joining as Clickbank Affiliate is free, and Clickbank is available in most countries.
Within the Affiliate Marketplace, you can browse the product categories on the left to look for the one that you want to promote.
How to get the product affiliate link
Assuming you already have in mind the product that you want to promote, you can follow the steps below to grab your unique affiliate link. (The demo below assumes you are promoting a product called “Home Doctor”)
Log in to Clickbank and go to Affiliate Marketplace.
In the Affiliate Marketplace, search for “Home Doctor”. Click on the Promote button

3. Enter your Clickbank Account Nickname and click on Create Hoplink to get your unique affiliate link. (tracking ID is optional)

4. Copy the generated link at the bottom of the window and you’re ready to promote!

How to find out my Clickbank Nickname?
If you’re not sure about your Clickbank Account Nickname, click on your name on the top-right – My Profile

Click on Accounts from the menu on the left and your nickname will be shown.

Can I shorten the link?
The generated link is usually long, and some called it “ugly”. And yes, you can use a link-shortening service to shorten it if you are promoting it via social media or sending the link directly to prospects.
How Do I Create A Professional Email Address?
To create a professional email address on your custom domain, such as [email protected], you first need to get a domain name. (eg [email protected])
Secondly, you need to get email hosting. I think the easiest (for those not technically inclined) is to buy from reputable domain hosting companies such as NameCheap, Godaddy, etc, where you can choose the plan that suits you. You would then be able to create an email within the email hosting service.
Another option is to create a professional email address within the web hosting. This is suitable for those who already have a web hosting subscription. I go with this option because I also use self-hosted WordPress. I do not need to pay extra by using my existing web hosting. I have the freedom to set the space (within the hosting plan limit) and create any alias that I like.
Another alternative is to use the forever-free plan from Zoho Mail. However, the free plan has smaller space/attachment limitations. (5GB/User, 25MB attachment limit)